Diving Deep into Shopify Winter ’24: Key Updates on Subscriptions, Variant Capacity, and Themes Blocks

On January 31st, Shopify unveiled a comprehensive update with over 100+ enhancements in the Shopify Winter ’24 Edition, focusing on reinforcing the core pillars of their platform for an improved merchant experience.

Key Areas of Upgrade in the Winter ’24 Edition:

  • Conversion
  • Channels
  • Marketing
  • Operations

These updates are meticulously designed to bolster the success of Shopify merchants, making the platform more robust and versatile. The Complete Edition details all updates.

This blog post is crafted with merchants in mind, aiming to demystify the updates in a clear and digestible manner. We will zoom in on three significant enhancements: enhanced subscription features, an increased limit for variants and Product Swatches, and the latest updates to the Shopify theme block. Practical examples from demo stores will be provided to showcase the tangible benefits of these updates, illustrating how they can be leveraged for merchant success.

1. Shopify Subscription App –

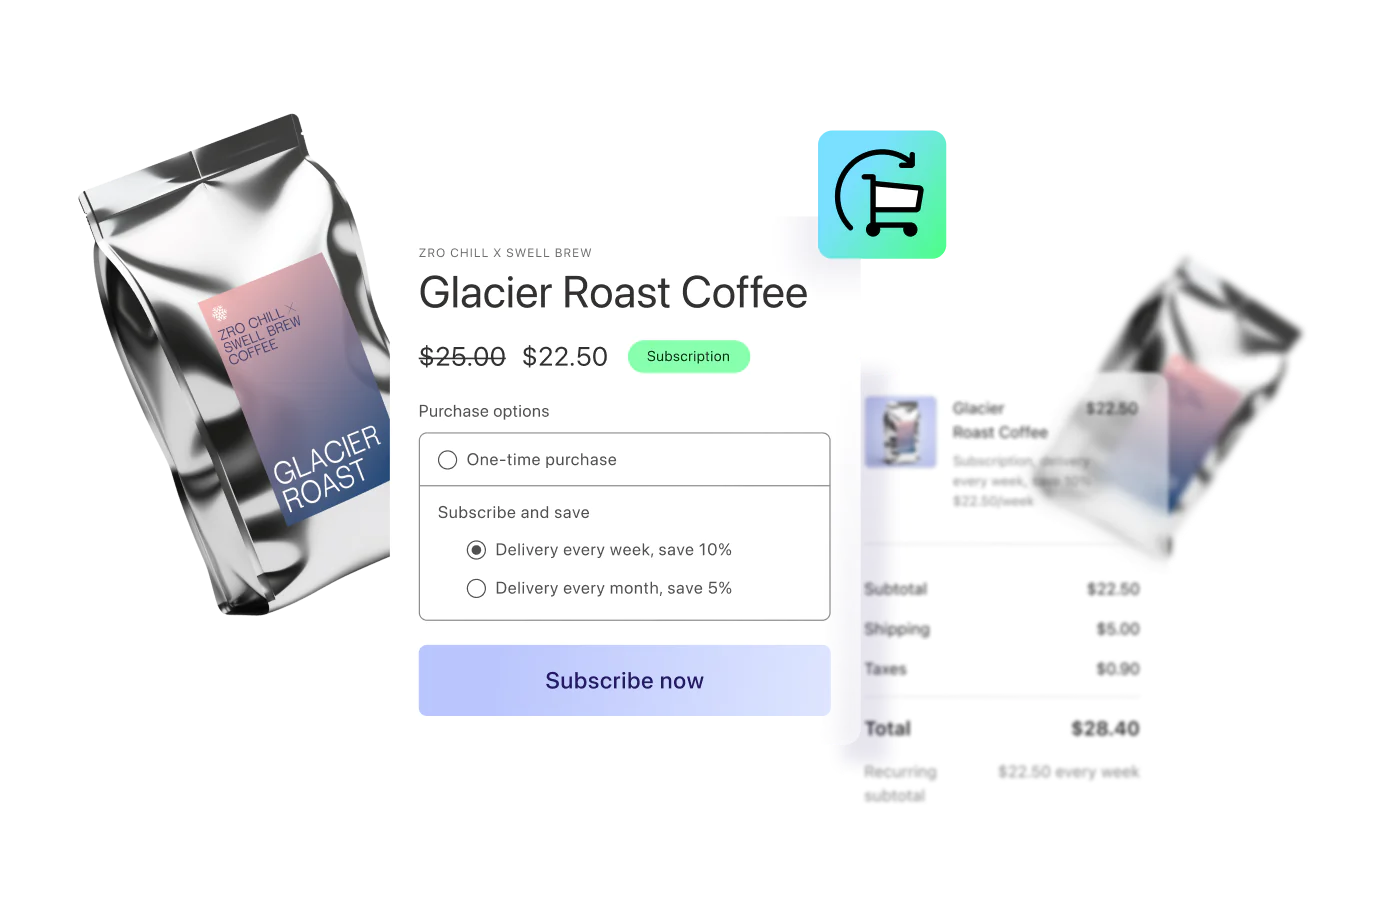
You can now boost customer lifetime value and ensure predictable revenue by offering products as subscriptions with Shopify’s new, free Subscriptions app.

Shopify’s new Subscriptions app allows merchants to directly manage and offer subscription models from the Shopify admin, enhancing customer retention and revenue stability. This feature simplifies setting up recurring payments and custom subscription options, offering a seamless integration for businesses looking to adopt or expand their subscription-based offerings.

  • Offer auto-billed subscriptions (renew weekly, monthly, or yearly) with discounts.
  • Allow your customers to cancel, skip, or pause subscriptions
  • Use customizable email templates for order confirmations or payment reminders
  • Access reporting to analyze your store’s subscription performance
  • Easily transfer existing subscription contracts to Shopify Subscriptions

shopify-subscription

How to Set Up Your First Subscription Plan

  • Installation and Initial Setup: Once the app is installed, a setup guide will appear, prompting you to create your first subscription plan. This plan will be available as a subscription option in your store.
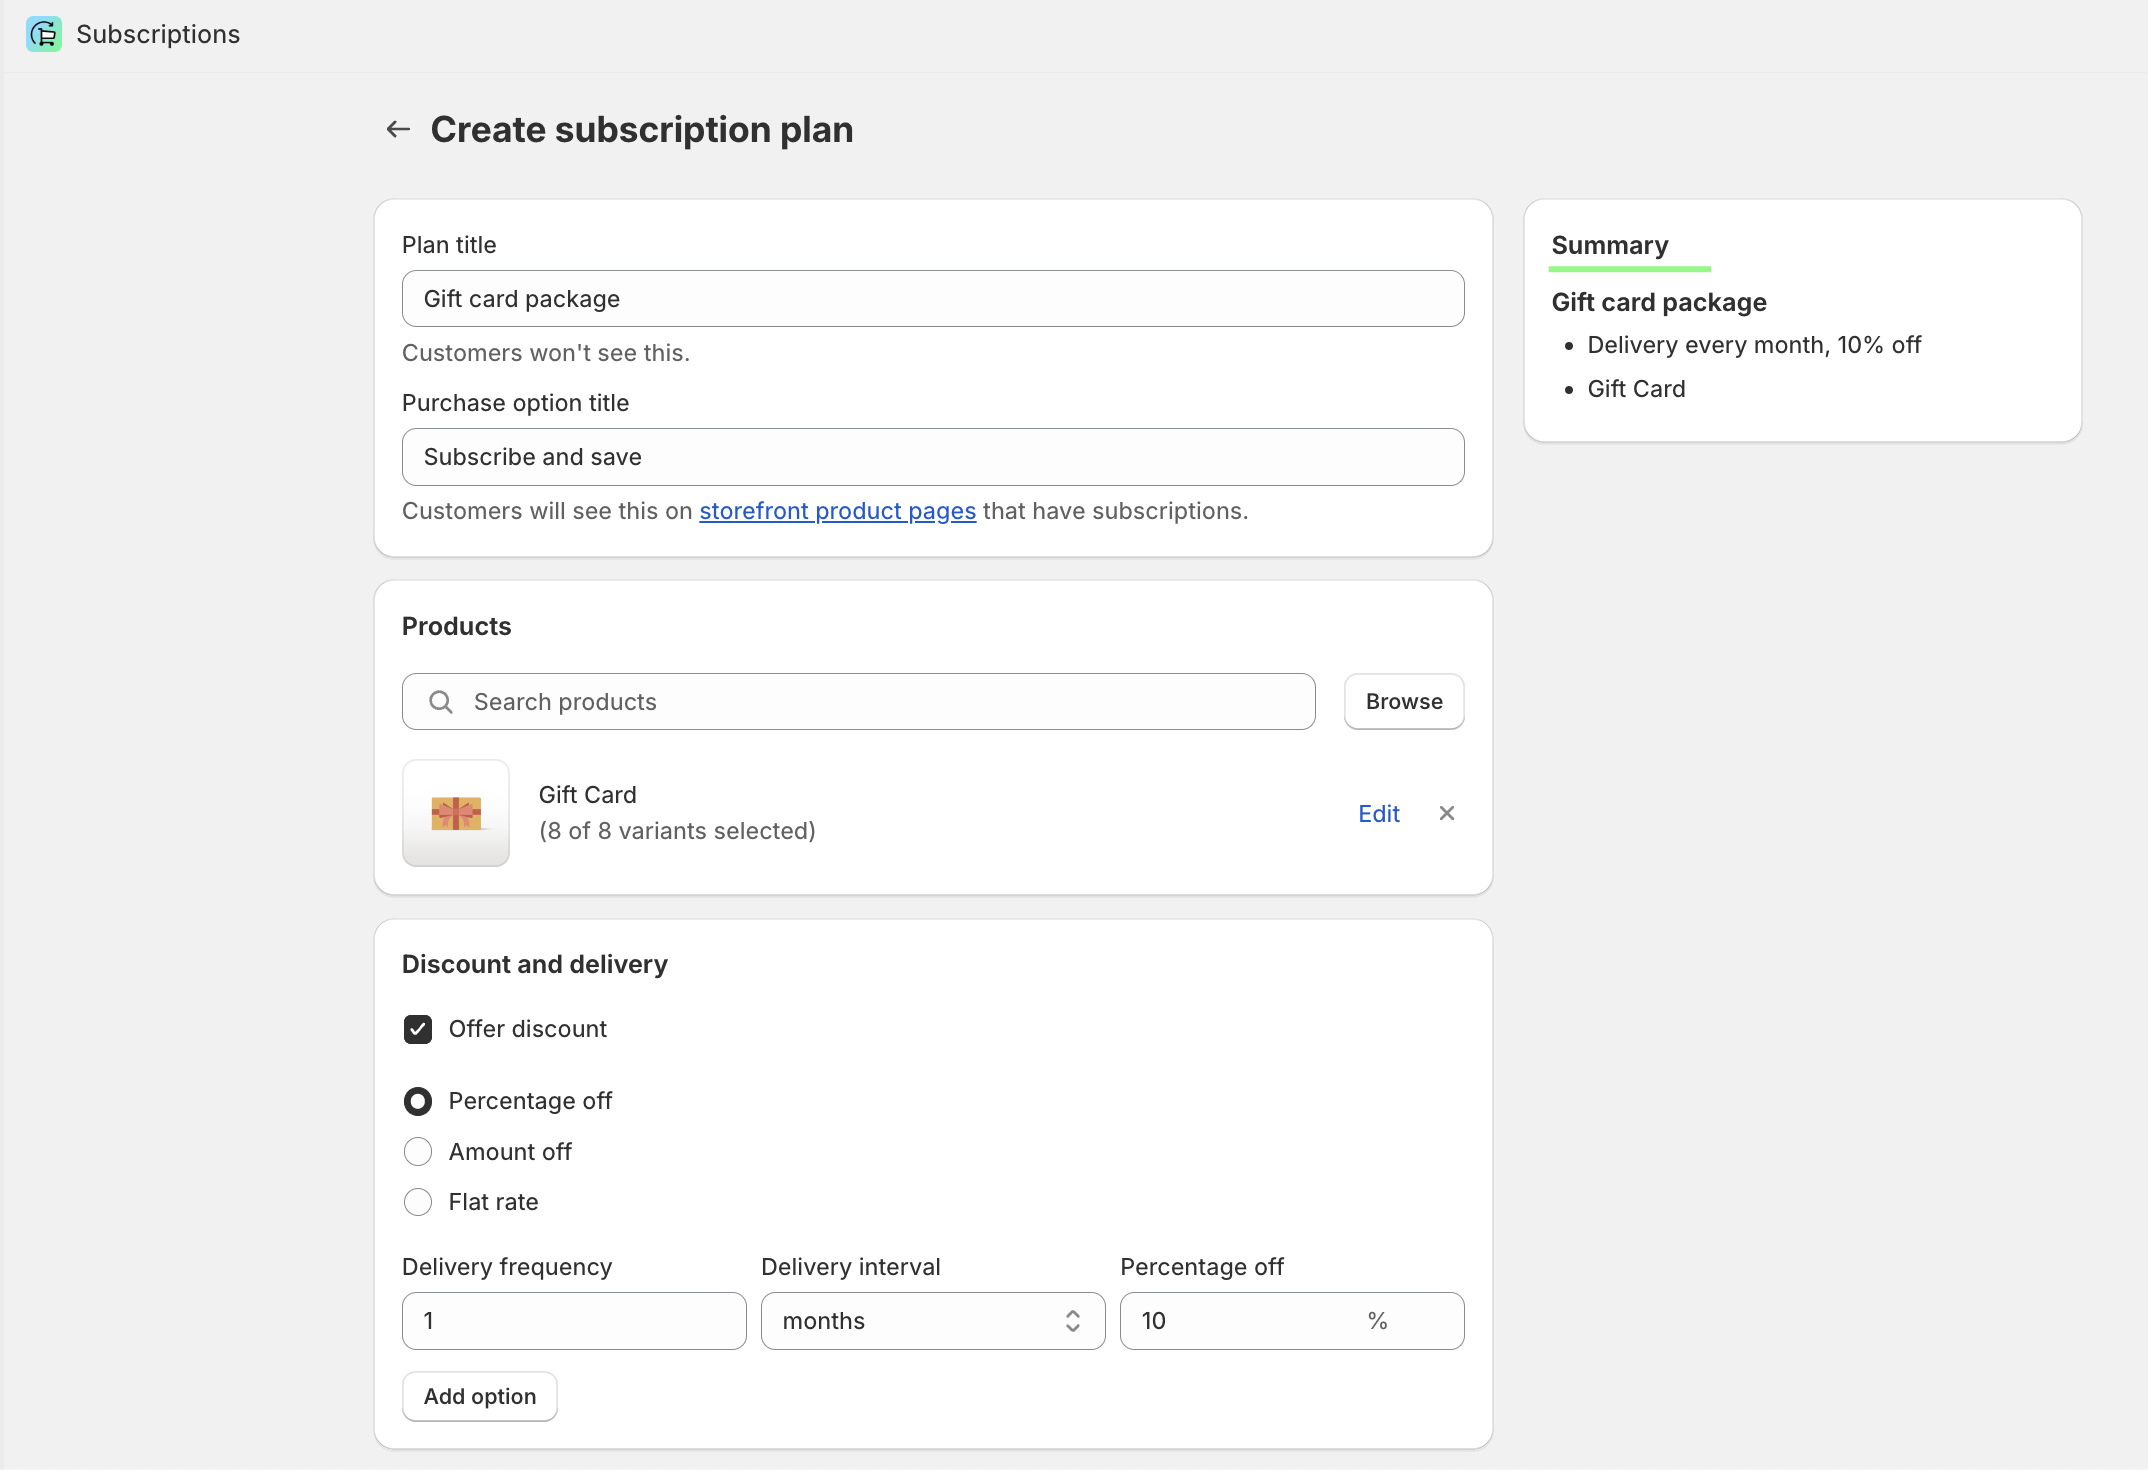
  • Creating Your First Subscription Plan:
    • Plan Name: Initially, add a name to your plan under “Plan Title.” Note that this title is for internal use and won’t be visible to customers.
    • Purchase Options Title: This is what your customers will see. It should clearly describe the subscription or plan, helping customers understand the value and content of the subscription.
  • Selecting Products for Your Subscription: Choose products from your store’s catalog to include in the subscription plan. For demonstration purposes, we’ve selected a gift card, but you’re free to select any product(s). Multiple products can be included in a single subscription plan.
  • Discount & Delivery Options: Offer discounts to your customers based on the delivery frequency of your choice. You can set up various delivery frequencies and corresponding discounts to encourage more frequent purchases and loyalty.
  • Subscription Summary: On the right side of the setup page, you’ll find a “Summary” section. This provides an overview of your subscription plan, including selected products, discounts, and delivery settings. This section helps you review and ensure all details are correct before finalizing the plan.

subscription app setting

After setting up your subscription, follow these steps to integrate it into your store:

  • Add the Subscription Widget to Your Product Page: This allows customers to subscribe directly from product pages.
  • Customize the Widget: Adjust its style and text to match your store’s theme for a seamless look and feel.

For a step-by-step guide on adding and customizing the widget, check out our theme integration tutorial.

subscription app widget

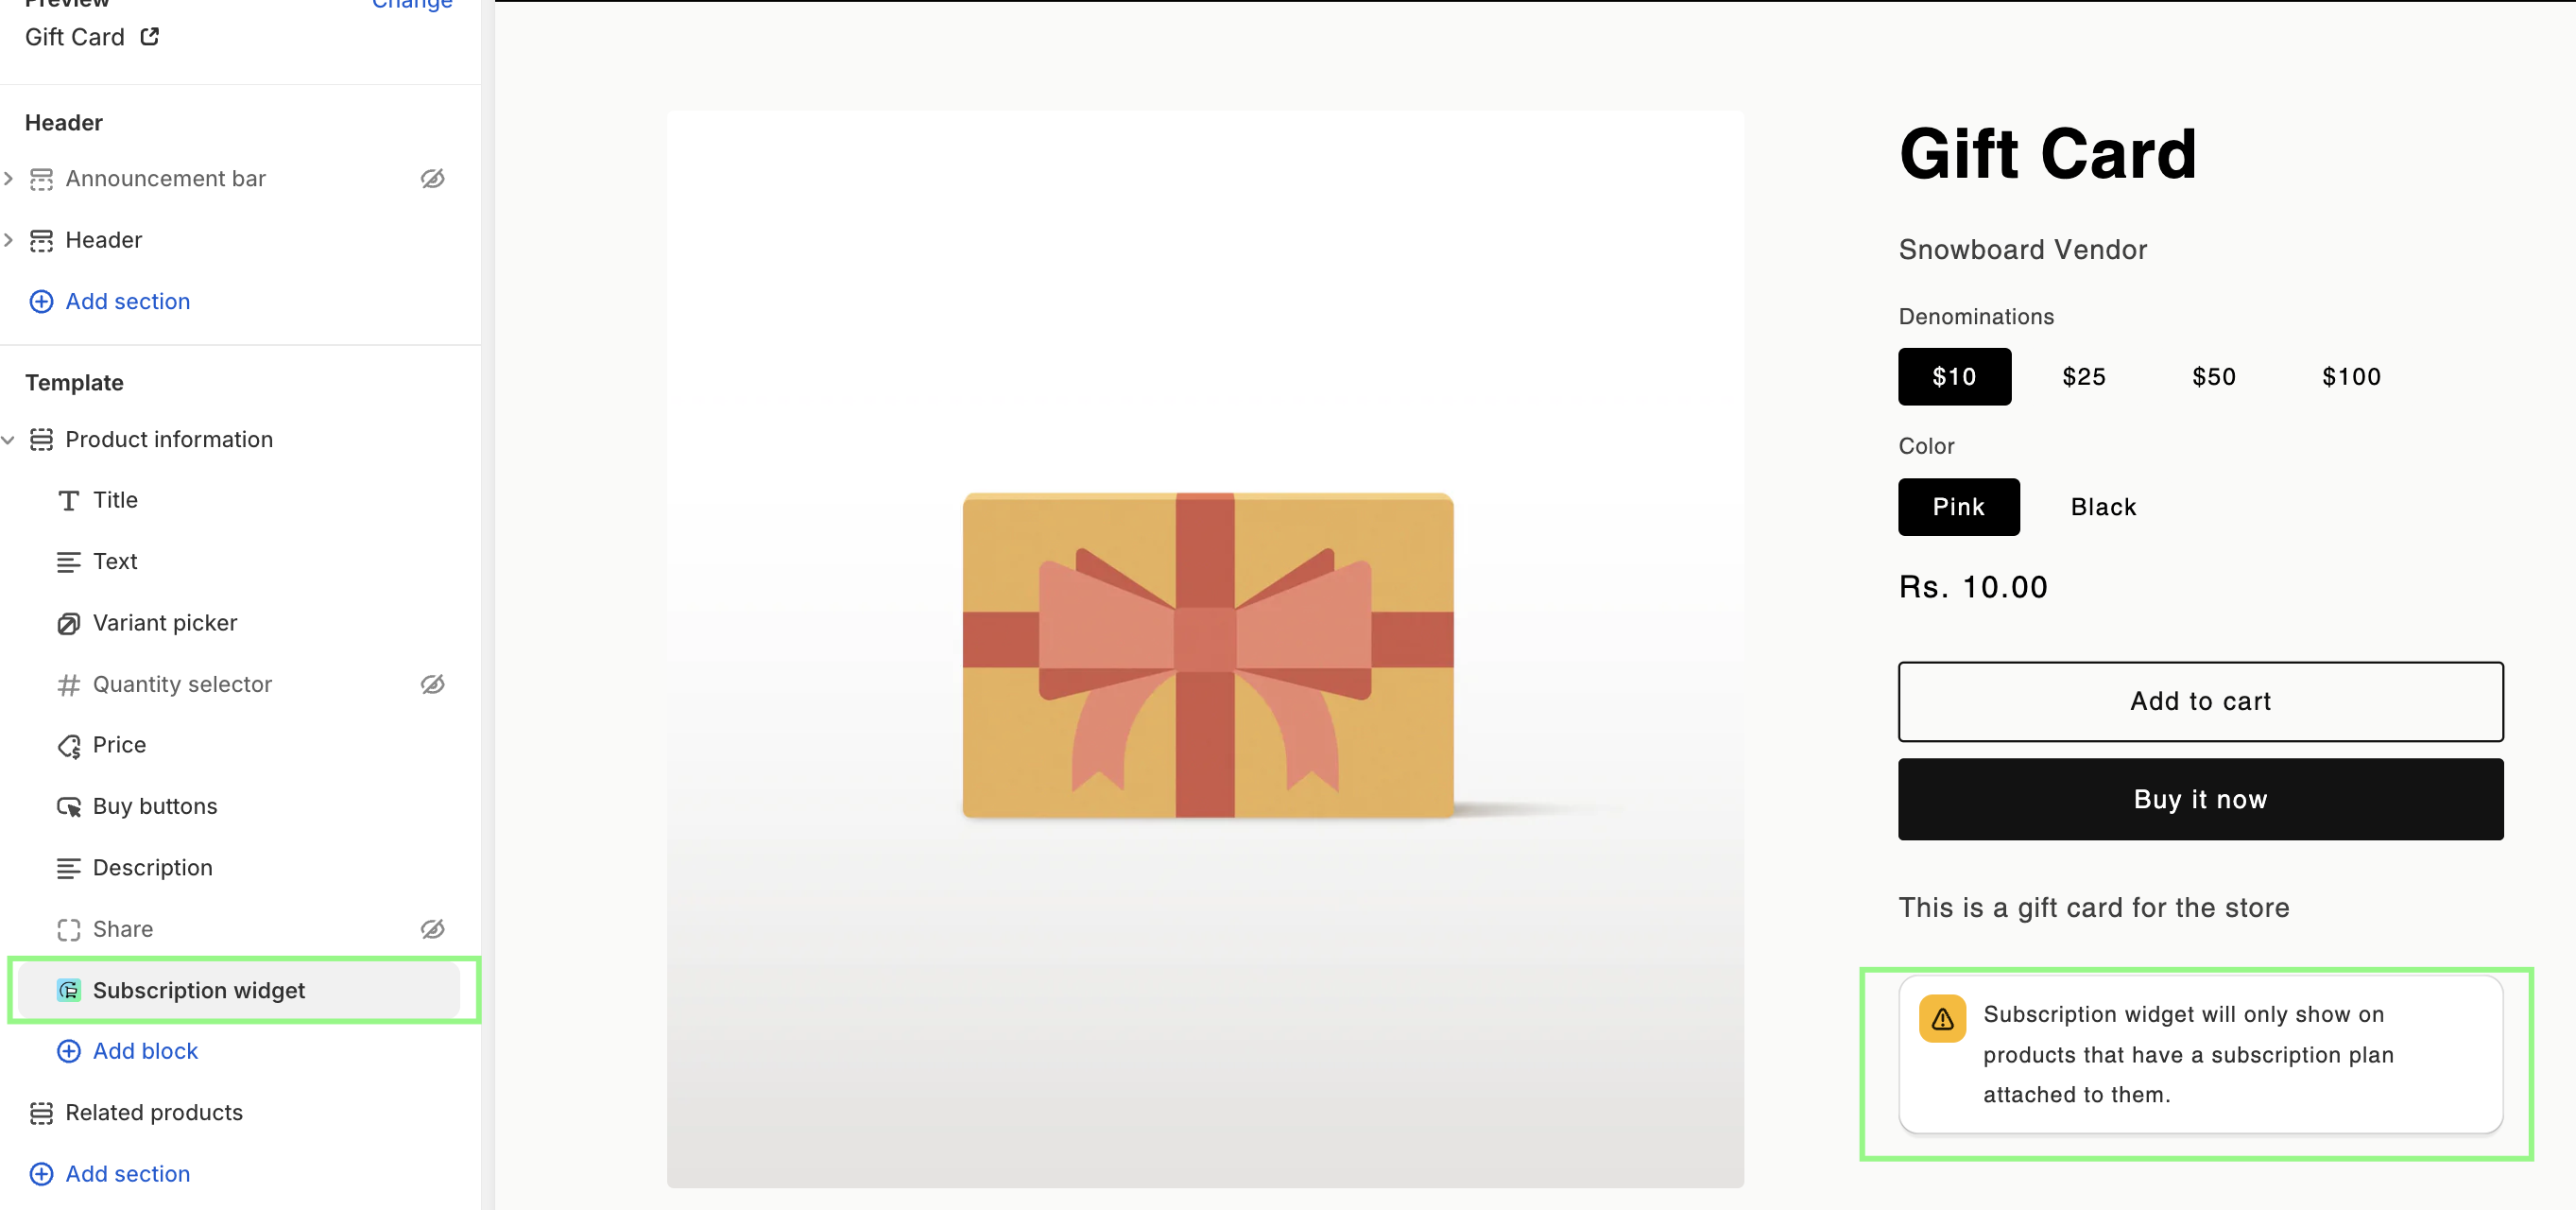
Now we can see the subscribe purchase option on the product page –

About Subscription App Policy –

If you have set up a subscription, then a new purchase options cancellation policy is added to your store. This policy is linked in the checkout footer as a subscription policy. If the policy in the Shopify admin settings is blank, then a generated template is displayed to customers. Add or edit your store policies to update the subscription policy that’s displayed to your customers.


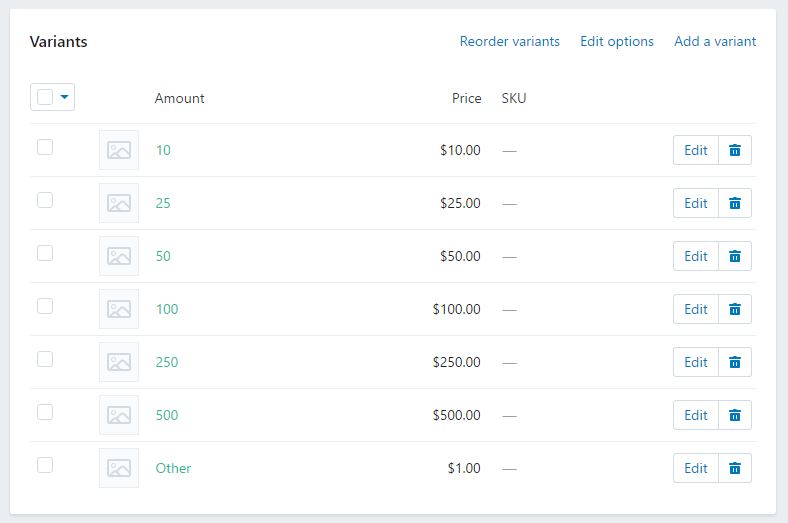
2. Products Variant Capacity – Opening the door to complex products.

Shopify has released a developer feature that people have been asking for years: they’ve increased the variant limit from the existing 100 variants to a staggering 2,000 variants. Currently, merchants are not allowed to create a product that creates more than 100 variants between all their product attribute combinations (size, color, and other product purchasing attributes). We know brands with diverse product lines who have shied away from Shopify because of this limitation. Now, this enhancement empowers businesses to showcase a broader range of product variations and not be limited to certain product attribute combinations on a product page.

Unfortunately, this increase will not be automatically built into Shopify admins but rather accessible via Shopify’s updated Product APIs. The feature is currently available in developer preview and is set to roll out to select merchants gradually throughout 2024. Even so, with this release, we see Shopify moving in the right direction and hope that, over time, this will become available on a larger scale.


3. Theme updates: Theme Blocks – Expanding theme flexibility

Perhaps the most exciting—albeit still yet to be released—feature mentioned in Editions is the nesting blocks functionality.

theme blocks in customizer

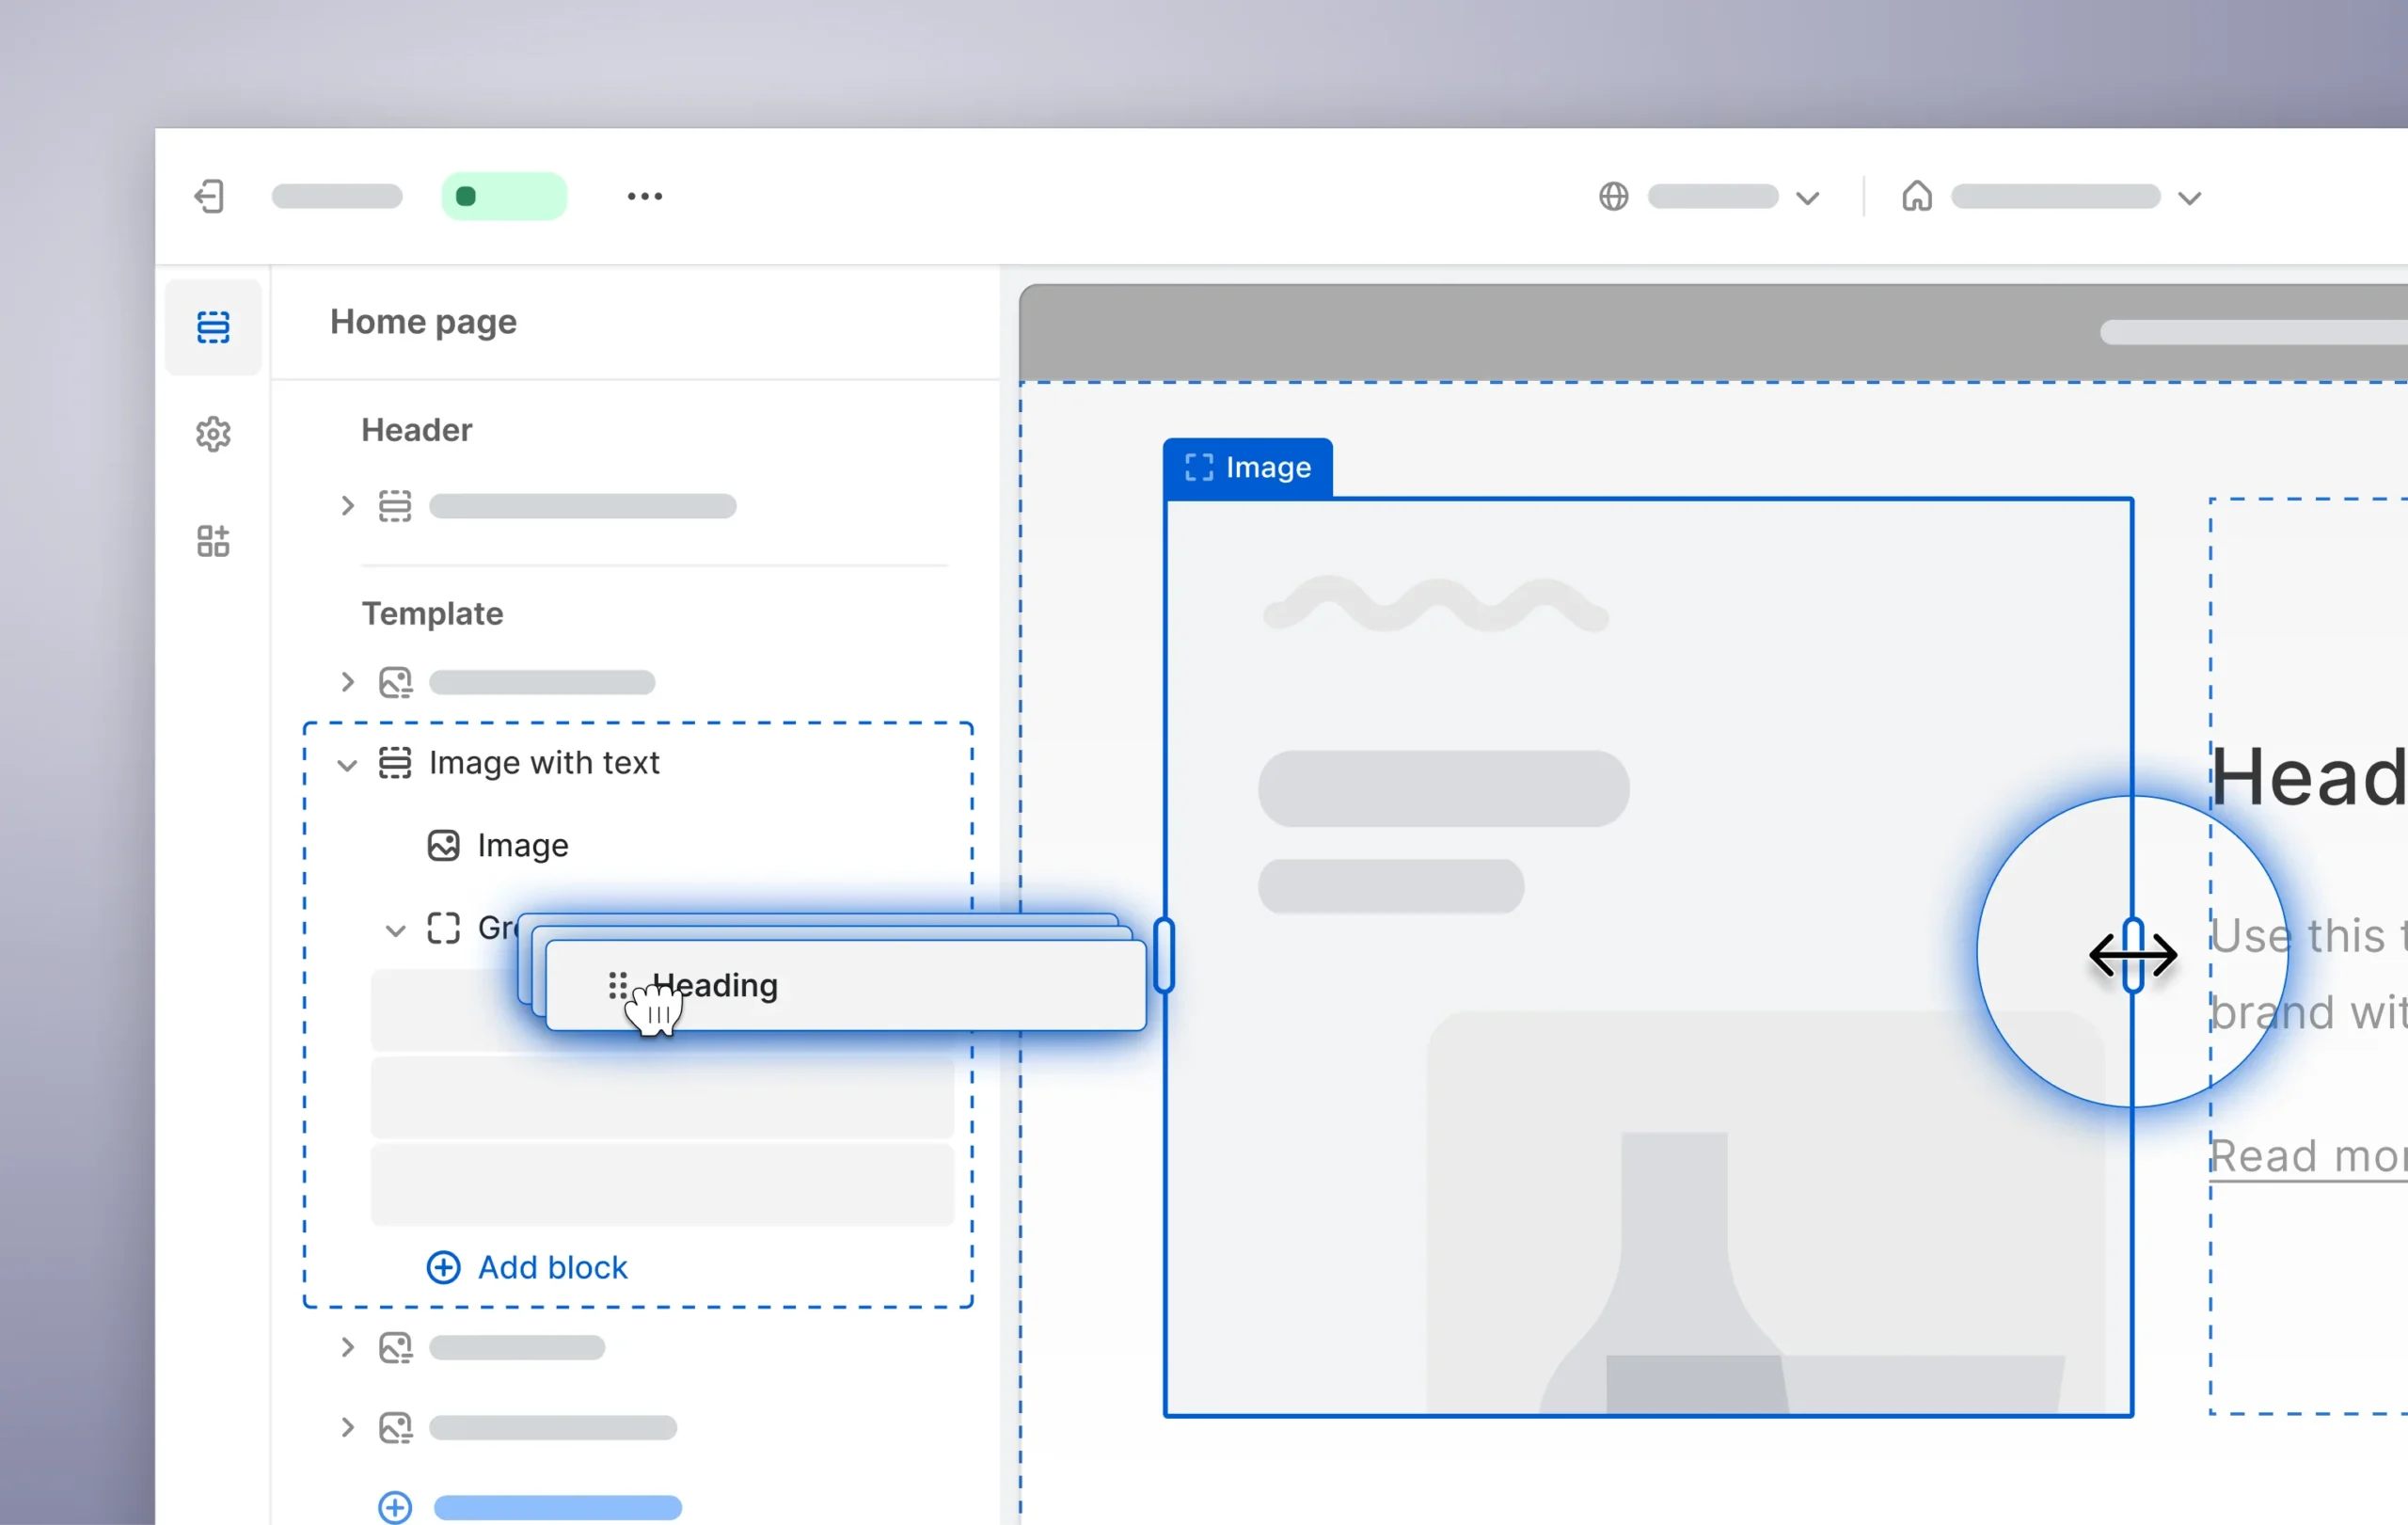
Developers working in the Liquid storefront can now define reusable atomic blocks and include them in multiple theme sections. They have their own schema that supports the application of HTML tags, classes, and merchant settings, among other things, and can even be nested inside other theme blocks!

theme blocks

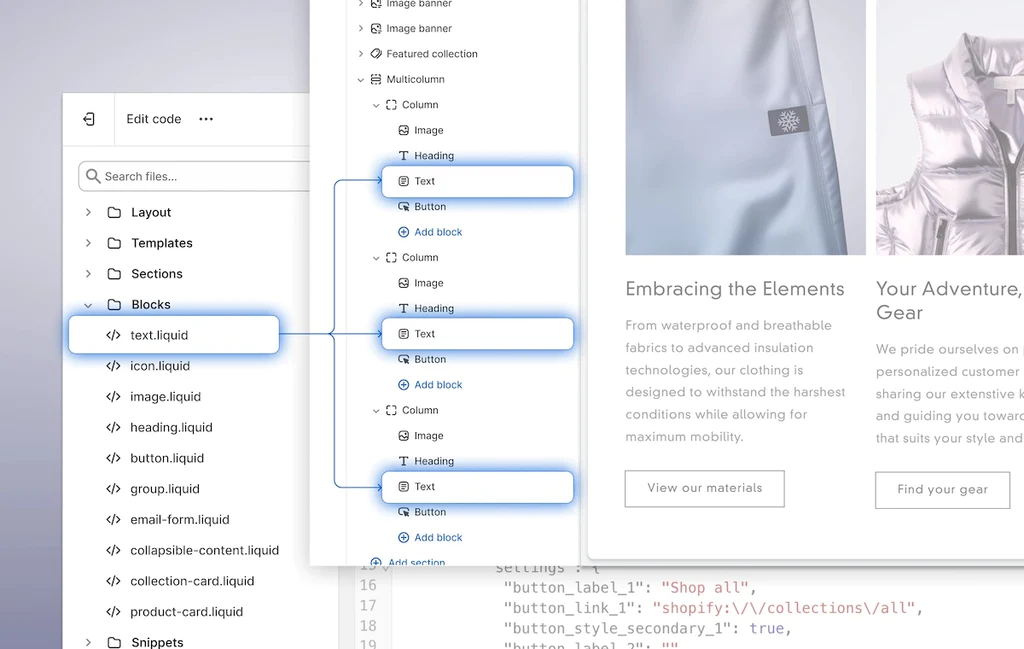
To create a theme block, all you need to do is add a ‘block.liquid’ file to the /blocks folder of your theme. Sections and blocks can opt-in to receiving theme blocks as children in their schema and render them by using the new {% content_for blocks %} liquid tag. Similar to presets in sections today, block presets allow you to define as many starting points for each individual theme block as you want, including multiple configurations of nested blocks. This makes it easy to create many starting points by reusing the same blocks.

Pulling theme blocks out of sections and giving them their own home is step one in the vision toward a more flexible editing experience. Theme blocks make a ton of sense to us. Building small, reusable blocks is a foundational part of developing software, and it’s great to see Shopify extend those principles to the storefront.

Theme blocks are in developer preview right now, which means you need to create a new development store in the Partner dashboard with the Theme block preview enabled to try them out. Also, check out the reference theme, which covers theme block structures and files.


Now is the time to harness these advancements and enhance your store’s performance to drive conversions. Whether you’re delving into subscription models, broadening your product range, or refining your theme with blocks, seize the opportunity to prepare for these changes.

Keep an eye out for further updates as these features evolve and redefine the future of commerce on Shopify. For assistance in implementing these updates, don’t hesitate to reach out to our team. We’re here to support your eCommerce success.

How to add custom notification message on Shopify checkout page

Today, I’ll write Quick tutorial on how to add custom notification message on shopify checkout. We’ll add two notifications, first one will remain visible all the time on shipping address page and second one will appear if customer select shipping country other than “United States”.

Here is the demo.

Here are the implementation steps:

Step 1: Go to Shopify Admin Panel. Under Sales Channel, Click on “Online Store” and after go to “Preferences” page.
Step 2: Under Google Analytics Section, It will have an option “Add Custom JavaScript to Google Analytics”. Just click on that.
Step 3: Paste this code in the script box.

function countryCheck(country) {
	if(country != 'United States'){           
	   Checkout.$("#country-message").show(0);
	} else {
	   Checkout.$("#country-message").hide(0);
	}
}
if(typeof Checkout === 'object'){
	if(typeof Checkout.$ === 'function'){
		//Default Message will be visible where as country specific message will be hidden
		notificationMsg = '<p id="default-message" style="background-color:#eee; padding:10px; margin:10px 0;">This is a default message. It will appear on page load.</p><p id="country-message" style="background-color:#eee; padding:10px; margin:10px 0; display:none;">This message will appear when you select country other than US.</p>';
		
		//Country Selectbox Selectbox
		$countrySelectboxId = Checkout.$("#checkout_shipping_address_country");
		
		// Insert Default Message on Page Load above the shipping methode section
		Checkout.$(notificationMsg).insertBefore('.section--shipping-address');
		
		// Check Country on Page Load
		countryName = $countrySelectboxId.val();
		
		// Call Country Check function on Page Load
        countryCheck(countryName)

		// Call Country Check function on selectobox change
		$countrySelectboxId.on("change", function(){
			countryName = $countrySelectboxId.val();
			countryCheck(countryName)
		});
		
		
	} // if ends

} // if ends

Now, Just save and then test.

You can also check the final code files on github: https://github.com/amandeepsinghvirdi/shopify-checkout

Creating Donation Product (with Desired Amount option) in Shopify

Every weekend I am planning to write some open source code snippets for Shopify platform. Today I’ll be demonstrating how to create Donation product in shopify which will have option to add desired donation amount. To accomplish this we’ll create a donation product with different variants (with single option “Amount”) each variant will have different price. And we’ll create a product template product.donation.liquid and assign this template to the newly created product. and we’ll make small changes to cart page template (to hide quantity selector and price option for variant).

Here is the demo.

Here are the implementation steps.

Step 1: Create donation product with different variants. See the picture below:

donation-product-variants

Step 2: Create a new product template (product.donation.liquid) and then assign it to newly created product.

Step 3:I am using timber framework for example. Open Product template and try to locate this code

          <label for="Quantity" class="quantity-selector">{{ 'products.product.quantity' | t }}</label>
          <input type="number" id="Quantity" name="quantity" value="1" min="1" class="quantity-selector">
          <button type="submit" name="add" id="AddToCart" class="btn">
            <span id="AddToCartText">{{ 'products.product.add_to_cart' | t }}</span>
         </button>

and then replace the above code with this one.

		 <!-- End: Donation Product Starts -->
          <div id="other-amount" style="display:none;">
            <label for="OtherAmount">Enter Amount:</label>
            <input type="text" id="OtherAmount"  />
          </div>
          <input type="hidden" id="Quantity" name="quantity" value="1" min="1" class="quantity-selector" />
            <div id="addto-cart-wrap">
              <button type="submit" name="add" id="AddToCart" class="btn">
                <span id="AddToCartText">{{ 'products.product.add_to_cart' | t }}</span>
              </button>
            </div>
			
		 <!-- End: Donation Product Code -->

Step 4: Now try to locate OptionSelectors callback function. Which looks like this:

var selectCallback = function(variant, selector) {
    timber.productPage({
      money_format: "{{ shop.money_format }}",
      variant: variant,
      selector: selector
    });
  }; // selectCallback Ends

and replace it with this one:

  var selectCallback = function(variant, selector) {
    timber.productPage({
      money_format: "{{ shop.money_format }}",
      variant: variant,
      selector: selector
    });
    
	// Donation Product Code Starts
    variantName = (variant.title).toLowerCase();    
    if(variantName == 'other'){
    	$('#other-amount').show(0);
        $('#OtherAmount').prop('required', true).val('');
        $('#ProductPrice').hide(0);
    } else {
    	$('#other-amount').hide(0);
        $('#OtherAmount').prop('required', false).val('');
        $('#Quantity').val(1)
        $('#ProductPrice').show(0);
    }    
	// Donation Product Code Ends    
  }; // selectCallback Ends

Above code will try to match “other” variant every time a variant is changed. And if its found then it will show up a text box to enter the desired amount.

Step 5: Now put this js code under document ready function. This code will update the pricing and quantity box. “Other Variant” has pricing as 1. So when someone will enter desired amount, we’ll update the product quantity and also show the price.

// Donation Product Code Starts
    $('#OtherAmount').keyup(function(){
    	console.log($(this).val());
        otherAmountValue = $(this).val();
          if(otherAmountValue == 0){
            alert('Please enter some value');
            $(this).val('');
            return false;
          }
      
        AmountPriceFormat = '$'+otherAmountValue;
        $('#Quantity').val(otherAmountValue);
        $('#ProductPrice').show(0).text(AmountPriceFormat);
    });
// Donation Product Code Ends

Step 6 (optional): If you want to hide your quantity and donation product price on cart page then follow this step. Try to locate this code in cart.liquid template.

            <td data-label="{{ 'cart.label.price' | t }}">
              <span class="h3">
                {{ item.price | money }}
              </span>
            </td>
            <td data-label="{{ 'cart.label.quantity' | t }}">
              <input type="number" name="updates[]" id="updates_{{ item.id }}" value="{{ item.quantity }}" min="0">
            </td>

and replace it with this one:

<!-- Donation Products Code Stars -->
            {% if item.url contains 'donation-product' %}
              <td data-label="{{ 'cart.label.price' | t }}"></td>
              <td data-label="{{ 'cart.label.quantity' | t }}"></td>            
            {% else %}
            <td data-label="{{ 'cart.label.price' | t }}">
              <span class="h3">
                {{ item.price | money }}
              </span>
            </td>
            <td data-label="{{ 'cart.label.quantity' | t }}">
              <input type="number" name="updates[]" id="updates_{{ item.id }}" value="{{ item.quantity }}" min="0" />
            </td>            
            {% endif %}
	<!-- Donation Products Code Ends -->

And thats it. Now you can test. If you find any issue, please leave a comment.

You can also check the final code files on github: https://github.com/amandeepsinghvirdi/donation-product-shopify

Maximum Quantity Limiter – Shopify

Few days ago I was working on a Shopify project and I made some customization in the liquid files to add quantity limiter (to variants). Currently I have setup this only for “Maximum” quantity (i.e. customer can not purchase product/variants more than the defined limit). I believe there are some application available for this purpose but this functionality can be easily achieved without using any paid app.

Here is the demo (Later I’ll explain how to add this into shopify):

Product A (Single Variant): Bjml Mystic Water Clean

This product has different sizes and you can find the max quantity allowed for each variant in the product description section.

Product B (Multiple Variants): Bobby Straight Recycled Renegade Mens Jean

This product has multiple variants (Size, Leg) and you can find the max quantity allowed for each variant combination in the product description section.

Implementation in theme files

On my sandbox account, I am using Shopify Timber Theme and Metafields Editor (Free App) to add limit for each variant.

Step 1: Go to Product to which you want to add limiter functionality. Open Metafields app from the product admin dashboard. Click on “Variants” tab and add metafield for the variant. Details for Metafield:

Namespace limit
Key max
Value Type integer
Value Any Numeric Value (Eg: 2)

After entering these details for each variant, please save the details

Step 2: Go to Theme Editor and open product.liquid and find this code block:

<select name="id" id="productSelect" class="product-single__variants">
            {% for variant in product.variants %}
              {% if variant.available %}

                {% comment %}
                  Note: if you use option_selection.js, your <select> tag will be overwritten, meaning what you have inside <option> will not reflect what you coded below.
                {% endcomment %}
                <option {% if variant == product.selected_or_first_available_variant %} selected="selected" {% endif %} data-sku="{{ variant.sku }}" value="{{ variant.id }}">{{ variant.title }} - {{ variant.price | money_with_currency }}</option>

              {% else %}
                <option disabled="disabled">
                  {{ variant.title }} - {{ 'products.product.sold_out' | t }}
                </option>
              {% endif %}
            {% endfor %}
          </select>

Replace the above code block with the code given below:

    
        {% if cart.item_count > 0 %}
          
			<select name="id" id="productSelect" class="product-single__variants">
                {% for variant in product.variants %}
                  {% if variant.available %}

                      {% for item in cart.items %}
                        {% if variant.id == item.variant_id %}
                            {% assign limiter = variant.metafields.limit %}
                            {% if item.quantity >= limiter.max %}
    		                        <option {% if variant == product.selected_or_first_available_variant %} selected="selected" {% endif %} data-sku="{{ variant.sku }}" value="{{ variant.id }}" data-max="{{ variant.metafields.limit.max | minus: item.quantity }}">{{ variant.title }} - {{ variant.price | money_with_currency }}</option>                          
                            {% else %}
									{% assign availability = true %}
    		                        <option {% if variant == product.selected_or_first_available_variant %} selected="selected" {% endif %} data-sku="{{ variant.sku }}" value="{{ variant.id }}" data-max="{{ variant.metafields.limit.max | minus: item.quantity }}">{{ variant.title }} - {{ variant.price | money_with_currency }}</option>                          
                            {% endif %}

                        {% else %} 
							{% assign availability = true %}
              				<option {% if variant == product.selected_or_first_available_variant %} selected="selected" {% endif %} data-sku="{{ variant.sku }}" value="{{ variant.id }}" data-max="{{variant.metafields.limit.max}}">{{ variant.title }} - {{ variant.price | money_with_currency }}</option>                                        
              
              			{% endif %}
              
                      {% endfor %}

                      {% comment %}
                      Note: if you use option_selection.js, your select tag will be overwritten, meaning what you have inside <option> will not reflect what you coded below.
                      {% endcomment %}

                  {% else %}
                      <option disabled="disabled">
                        {{ variant.title }} - {{ 'products.product.sold_out' | t }}
                      </option>
                  {% endif %}
              
              
                {% endfor %}
              </select>                    
              
          
          {% else %} 
          
            <select name="id" id="productSelect" class="product-single__variants">
				{% assign availability = true %}

                {% for variant in product.variants %}
                  {% if variant.available %}

                      {% comment %}
                      Note: if you use option_selection.js, your select tag will be overwritten, meaning what you have inside <option> will not reflect what you coded below.
                      {% endcomment %}
                      <option {% if variant == product.selected_or_first_available_variant %} selected="selected" {% endif %} data-sku="{{ variant.sku }}" value="{{ variant.id }}" data-max="{{variant.metafields.limit.max}}">{{ variant.title }} - {{ variant.price | money_with_currency }}</option>            
                  {% else %}
                      <option disabled="disabled">
                        {{ variant.title }} - {{ 'products.product.sold_out' | t }}
                      </option>
                  {% endif %}
                {% endfor %}
              </select>
          
          {% endif %}  

Step 3: At the bottom of product.liquid. Please add this code.

    
$("#AddToCartForm").on("submit", function(){
      	variant_id = $('#productSelect').val();
        variant_max = parseInt($('#productSelect option[value="'+variant_id+'"]').attr('data-max'));
        variant_qty = parseInt($("#Quantity").val());
        if(variant_qty > variant_max){
          if(variant_max==0){
          alert("You've already reached to the max limit allowed for this product option.");
          } else {
          alert("You can not add more than " + variant_max + " quantity of this product.");
          }
          return false;
        }
 }); 

Step 4: Go to Cart.liquid template file and define this variable in the beginning of the file (before the cart item count if condition)

{% assign processCheckout = true %}

Step 5: Within the cart.liquid template file. Find this code block:

 <td data-label="{{ 'cart.label.quantity' | t }}">
    <input type="number" name="updates[]" id="updates_{{ item.id }}" value="{{ item.quantity }}" min="0">
 </td>

And Replace the above code with this one:

<td data-label="{{ 'cart.label.quantity' | t }}">
<input type="number" name="updates[]" id="updates_{{ item.id }}" value="{{ item.quantity }}" min="0" {% if item.variant.metafields.limit.max %} max="{{item.variant.metafields.limit.max}}"{% endif %}>
 {% if item.quantity > item.variant.metafields.limit.max %}
    <p class="cart_max-qty"><strong>Max Qty : {{item.variant.metafields.limit.max}}</strong></p>              
    {% assign processCheckout = false %}
 {% endif %}
</td>

Step 6: Within the cart.liquid template file. Find this code block (should be at the end of file):

<input type="submit" name="checkout" class="btn" value="{{ 'cart.general.checkout' | t }}">

And replace the above mentioned code with this one:

        
 {% if processCheckout %}
      	<input type="submit" name="checkout" class="btn" value="{{ 'cart.general.checkout' | t }}">
 {% else %}
      	<p class="info-message">One or more items exceeds the maximum limit. Please reduce to the quantity to proceed to checkout. </p>
 {% endif %}        

And Thats it. You’re done!! Now you can test. Cart Limiter should work. If you find any problem then please leave a comment or email me.

You can also check the final code files on github: https://github.com/amandeepsinghvirdi/shopify-quantity-limiter