I have been working on a night shift for last five years. And sleeping during daytime is not as relaxing as we sleep at night. But to my surprise, I slept continuous 8 hours in last two days (it rarely happens)! and it was really kinda achievement for me. Very much relaxing and refreshing! After a very long time, I got this much long sleep (without any interruption).
Changing Shopify Template using url
https://www.shopify.com/partners/blog/82610694-how-to-use-alternate-templates-in-shopify-theme-development
Night Shifts and My Team
I’ve been working in night shifts for past 4.5 years and looks like now I’ve become habitual. I don’t feel sleepy during night (If I have got good sleep during my daytime). Things are going fine with me so far but my new team members are struggling to work in night shift. I really love my team members because everyone in my team is so much hardworking and dedicated. And I feel bad as they are falling sick. In recent one month, half of my team was struggling with health issues due to night shift. I am trying to adjust their working hours like few hours their local time and remaining hours on PST. But with this schedule, I get myself alone at PST hours and get so much pressure to work on multiple things at the same time (because no help (team members) available at that time). Confused what to do 🙁
Setting Up Apache Virtual Hosts on Ubuntu
https://www.digitalocean.com/community/tutorials/how-to-set-up-apache-virtual-hosts-on-ubuntu-14-04-lts
How to add custom notification message on Shopify checkout page
Today, I’ll write Quick tutorial on how to add custom notification message on shopify checkout. We’ll add two notifications, first one will remain visible all the time on shipping address page and second one will appear if customer select shipping country other than “United States”.
Here is the demo.
Here are the implementation steps:
Step 1: Go to Shopify Admin Panel. Under Sales Channel, Click on “Online Store” and after go to “Preferences” page.
Step 2: Under Google Analytics Section, It will have an option “Add Custom JavaScript to Google Analytics”. Just click on that.
Step 3: Paste this code in the script box.
function countryCheck(country) {
	if(country != 'United States'){
	   Checkout.$("#country-message").show(0);
	} else {
	   Checkout.$("#country-message").hide(0);
	}
}
if(typeof Checkout === 'object'){
	if(typeof Checkout.$ === 'function'){
		//Default Message will be visible where as country specific message will be hidden
		notificationMsg = '<p id="default-message" style="background-color:#eee; padding:10px; margin:10px 0;">This is a default message. It will appear on page load.</p><p id="country-message" style="background-color:#eee; padding:10px; margin:10px 0; display:none;">This message will appear when you select country other than US.</p>';

		//Country Selectbox Selectbox
		$countrySelectboxId = Checkout.$("#checkout_shipping_address_country");

		// Insert Default Message on Page Load above the shipping methode section
		Checkout.$(notificationMsg).insertBefore('.section--shipping-address');

		// Check Country on Page Load
		countryName = $countrySelectboxId.val();

		// Call Country Check function on Page Load
        countryCheck(countryName)

		// Call Country Check function on selectobox change
		$countrySelectboxId.on("change", function(){
			countryName = $countrySelectboxId.val();
			countryCheck(countryName)
		});


	} // if ends

} // if ends
Now, Just save and then test.
You can also check the final code files on github: https://github.com/amandeepsinghvirdi/shopify-checkout
Difficult Decision
Firing/Letting someone go is one of the most difficult decisions for management. Today I sent a goodbye email to one of our developers. I tried to be very much polite and positive and also explained about the reason of this difficult decision.
I give enough chances to team member to improve and even work with them to improve their skills, offer learning sessions over weekends and try my best to keep them in the team. But if team member does not show enthusiasm and willingness to improve, we had to take this decision. 🙁
Creating Donation Product (with Desired Amount option) in Shopify
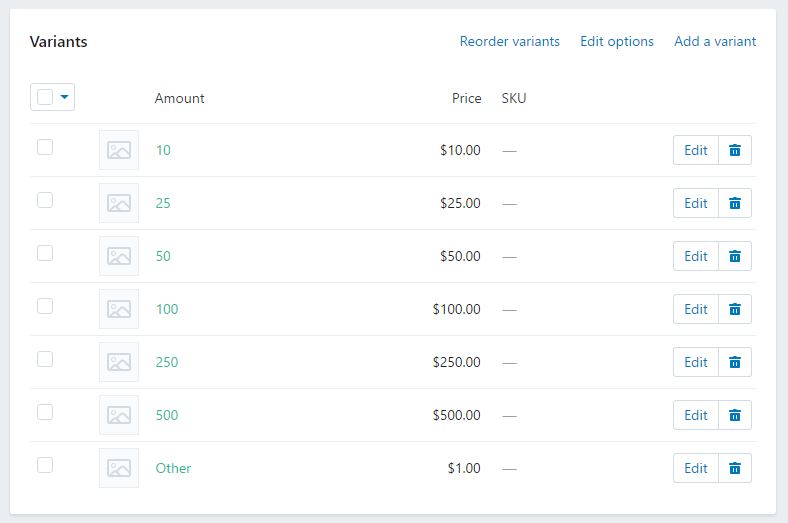
Every weekend I am planning to write some open source code snippets for Shopify platform. Today I’ll be demonstrating how to create Donation product in shopify which will have option to add desired donation amount. To accomplish this we’ll create a donation product with different variants (with single option “Amount”) each variant will have different price. And we’ll create a product template product.donation.liquid and assign this template to the newly created product. and we’ll make small changes to cart page template (to hide quantity selector and price option for variant).
Here is the demo.
Here are the implementation steps.
Step 1: Create donation product with different variants. See the picture below:
Step 2: Create a new product template (product.donation.liquid) and then assign it to newly created product.
Step 3:I am using timber framework for example. Open Product template and try to locate this code
          <label for="Quantity" class="quantity-selector">{{ 'products.product.quantity' | t }}</label>
          <input type="number" id="Quantity" name="quantity" value="1" min="1" class="quantity-selector">
          <button type="submit" name="add" id="AddToCart" class="btn">
            <span id="AddToCartText">{{ 'products.product.add_to_cart' | t }}</span>
         </button>
and then replace the above code with this one.
		 <!-- End: Donation Product Starts -->
          <div id="other-amount" style="display:none;">
            <label for="OtherAmount">Enter Amount:</label>
            <input type="text" id="OtherAmount"  />
          </div>
          <input type="hidden" id="Quantity" name="quantity" value="1" min="1" class="quantity-selector" />
            <div id="addto-cart-wrap">
              <button type="submit" name="add" id="AddToCart" class="btn">
                <span id="AddToCartText">{{ 'products.product.add_to_cart' | t }}</span>
              </button>
            </div>

		 <!-- End: Donation Product Code -->
Step 4: Now try to locate OptionSelectors callback function. Which looks like this:
var selectCallback = function(variant, selector) {
    timber.productPage({
      money_format: "{{ shop.money_format }}",
      variant: variant,
      selector: selector
    });
  }; // selectCallback Ends
and replace it with this one:
  var selectCallback = function(variant, selector) {
    timber.productPage({
      money_format: "{{ shop.money_format }}",
      variant: variant,
      selector: selector
    });

	// Donation Product Code Starts
    variantName = (variant.title).toLowerCase();
    if(variantName == 'other'){
    	$('#other-amount').show(0);
        $('#OtherAmount').prop('required', true).val('');
        $('#ProductPrice').hide(0);
    } else {
    	$('#other-amount').hide(0);
        $('#OtherAmount').prop('required', false).val('');
        $('#Quantity').val(1)
        $('#ProductPrice').show(0);
    }
	// Donation Product Code Ends
  }; // selectCallback Ends
Above code will try to match “other” variant every time a variant is changed. And if its found then it will show up a text box to enter the desired amount.
Step 5: Now put this js code under document ready function. This code will update the pricing and quantity box. “Other Variant” has pricing as 1. So when someone will enter desired amount, we’ll update the product quantity and also show the price.
// Donation Product Code Starts
    $('#OtherAmount').keyup(function(){
    	console.log($(this).val());
        otherAmountValue = $(this).val();
          if(otherAmountValue == 0){
            alert('Please enter some value');
            $(this).val('');
            return false;
          }

        AmountPriceFormat = '$'+otherAmountValue;
        $('#Quantity').val(otherAmountValue);
        $('#ProductPrice').show(0).text(AmountPriceFormat);
    });
// Donation Product Code Ends
Step 6 (optional): If you want to hide your quantity and donation product price on cart page then follow this step. Try to locate this code in cart.liquid template.
            <td data-label="{{ 'cart.label.price' | t }}">
              <span class="h3">
                {{ item.price | money }}
              </span>
            </td>
            <td data-label="{{ 'cart.label.quantity' | t }}">
              <input type="number" name="updates[]" id="updates_{{ item.id }}" value="{{ item.quantity }}" min="0">
            </td>
and replace it with this one:
<!-- Donation Products Code Stars -->
            {% if item.url contains 'donation-product' %}
              <td data-label="{{ 'cart.label.price' | t }}"></td>
              <td data-label="{{ 'cart.label.quantity' | t }}"></td>
            {% else %}
            <td data-label="{{ 'cart.label.price' | t }}">
              <span class="h3">
                {{ item.price | money }}
              </span>
            </td>
            <td data-label="{{ 'cart.label.quantity' | t }}">
              <input type="number" name="updates[]" id="updates_{{ item.id }}" value="{{ item.quantity }}" min="0" />
            </td>
            {% endif %}
	<!-- Donation Products Code Ends -->
And thats it. Now you can test. If you find any issue, please leave a comment.
You can also check the final code files on github: https://github.com/amandeepsinghvirdi/donation-product-shopify
Multiple Bitbucket Accounts and SSH Keys
http://dbushell.com/2013/01/27/multiple-accounts-and-ssh-keys/
Maximum Quantity Limiter – Shopify
Few days ago I was working on a Shopify project and I made some customization in the liquid files to add quantity limiter (to variants). Currently I have setup this only for “Maximum” quantity (i.e. customer can not purchase product/variants more than the defined limit). I believe there are some application available for this purpose but this functionality can be easily achieved without using any paid app.
Here is the demo (Later I’ll explain how to add this into shopify):
Product A (Single Variant): Bjml Mystic Water Clean
This product has different sizes and you can find the max quantity allowed for each variant in the product description section.
Product B (Multiple Variants): Bobby Straight Recycled Renegade Mens Jean
This product has multiple variants (Size, Leg) and you can find the max quantity allowed for each variant combination in the product description section.
Implementation in theme files
On my sandbox account, I am using Shopify Timber Theme and Metafields Editor (Free App) to add limit for each variant.
Step 1: Go to Product to which you want to add limiter functionality. Open Metafields app from the product admin dashboard. Click on “Variants” tab and add metafield for the variant. Details for Metafield:
| Namespace | limit |
| Key | max |
| Value Type | integer |
| Value | Any Numeric Value (Eg: 2) |
After entering these details for each variant, please save the details
Step 2: Go to Theme Editor and open product.liquid and find this code block:
<select name="id" id="productSelect" class="product-single__variants">
            {% for variant in product.variants %}
              {% if variant.available %}

                {% comment %}
                  Note: if you use option_selection.js, your <select> tag will be overwritten, meaning what you have inside <option> will not reflect what you coded below.
                {% endcomment %}
                <option {% if variant == product.selected_or_first_available_variant %} selected="selected" {% endif %} data-sku="{{ variant.sku }}" value="{{ variant.id }}">{{ variant.title }} - {{ variant.price | money_with_currency }}</option>

              {% else %}
                <option disabled="disabled">
                  {{ variant.title }} - {{ 'products.product.sold_out' | t }}
                </option>
              {% endif %}
            {% endfor %}
          </select>
Replace the above code block with the code given below:
        {% if cart.item_count > 0 %}

			<select name="id" id="productSelect" class="product-single__variants">
                {% for variant in product.variants %}
                  {% if variant.available %}

                      {% for item in cart.items %}
                        {% if variant.id == item.variant_id %}
                            {% assign limiter = variant.metafields.limit %}
                            {% if item.quantity >= limiter.max %}
    		                        <option {% if variant == product.selected_or_first_available_variant %} selected="selected" {% endif %} data-sku="{{ variant.sku }}" value="{{ variant.id }}" data-max="{{ variant.metafields.limit.max | minus: item.quantity }}">{{ variant.title }} - {{ variant.price | money_with_currency }}</option>
                            {% else %}
									{% assign availability = true %}
    		                        <option {% if variant == product.selected_or_first_available_variant %} selected="selected" {% endif %} data-sku="{{ variant.sku }}" value="{{ variant.id }}" data-max="{{ variant.metafields.limit.max | minus: item.quantity }}">{{ variant.title }} - {{ variant.price | money_with_currency }}</option>
                            {% endif %}

                        {% else %}
							{% assign availability = true %}
              				<option {% if variant == product.selected_or_first_available_variant %} selected="selected" {% endif %} data-sku="{{ variant.sku }}" value="{{ variant.id }}" data-max="{{variant.metafields.limit.max}}">{{ variant.title }} - {{ variant.price | money_with_currency }}</option>

              			{% endif %}

                      {% endfor %}

                      {% comment %}
                      Note: if you use option_selection.js, your select tag will be overwritten, meaning what you have inside <option> will not reflect what you coded below.
                      {% endcomment %}

                  {% else %}
                      <option disabled="disabled">
                        {{ variant.title }} - {{ 'products.product.sold_out' | t }}
                      </option>
                  {% endif %}


                {% endfor %}
              </select>


          {% else %}

            <select name="id" id="productSelect" class="product-single__variants">
				{% assign availability = true %}

                {% for variant in product.variants %}
                  {% if variant.available %}

                      {% comment %}
                      Note: if you use option_selection.js, your select tag will be overwritten, meaning what you have inside <option> will not reflect what you coded below.
                      {% endcomment %}
                      <option {% if variant == product.selected_or_first_available_variant %} selected="selected" {% endif %} data-sku="{{ variant.sku }}" value="{{ variant.id }}" data-max="{{variant.metafields.limit.max}}">{{ variant.title }} - {{ variant.price | money_with_currency }}</option>
                  {% else %}
                      <option disabled="disabled">
                        {{ variant.title }} - {{ 'products.product.sold_out' | t }}
                      </option>
                  {% endif %}
                {% endfor %}
              </select>

          {% endif %}
Step 3: At the bottom of product.liquid. Please add this code.
$("#AddToCartForm").on("submit", function(){
      	variant_id = $('#productSelect').val();
        variant_max = parseInt($('#productSelect option[value="'+variant_id+'"]').attr('data-max'));
        variant_qty = parseInt($("#Quantity").val());
        if(variant_qty > variant_max){
          if(variant_max==0){
          alert("You've already reached to the max limit allowed for this product option.");
          } else {
          alert("You can not add more than " + variant_max + " quantity of this product.");
          }
          return false;
        }
 });
Step 4: Go to Cart.liquid template file and define this variable in the beginning of the file (before the cart item count if condition)
{% assign processCheckout = true %}
Step 5: Within the cart.liquid template file. Find this code block:
 <td data-label="{{ 'cart.label.quantity' | t }}">
    <input type="number" name="updates[]" id="updates_{{ item.id }}" value="{{ item.quantity }}" min="0">
 </td>
And Replace the above code with this one:
<td data-label="{{ 'cart.label.quantity' | t }}">
<input type="number" name="updates[]" id="updates_{{ item.id }}" value="{{ item.quantity }}" min="0" {% if item.variant.metafields.limit.max %} max="{{item.variant.metafields.limit.max}}"{% endif %}>
 {% if item.quantity > item.variant.metafields.limit.max %}
    <p class="cart_max-qty"><strong>Max Qty : {{item.variant.metafields.limit.max}}</strong></p>
    {% assign processCheckout = false %}
 {% endif %}
</td>
Step 6: Within the cart.liquid template file. Find this code block (should be at the end of file):
<input type="submit" name="checkout" class="btn" value="{{ 'cart.general.checkout' | t }}">
And replace the above mentioned code with this one:
 {% if processCheckout %}
      	<input type="submit" name="checkout" class="btn" value="{{ 'cart.general.checkout' | t }}">
 {% else %}
      	<p class="info-message">One or more items exceeds the maximum limit. Please reduce to the quantity to proceed to checkout. </p>
 {% endif %}
And Thats it. You’re done!! Now you can test. Cart Limiter should work. If you find any problem then please leave a comment or email me.
You can also check the final code files on github: https://github.com/amandeepsinghvirdi/shopify-quantity-limiter
Programmer’s Love
People count the leaves of a flower to guess whether the other person loves or not. And Programmer counts the lines of code. 🙂